Kubeflow란?
정의
- Kubeflow는 Kubernetes 위에서
머신러닝 워크플로우를 구축·실행·관리하기 위한 오픈소스 플랫폼 - 컨테이너 기반 ML 파이프라인 운영에 최적화
기능 및 특징
- Kubernetes 기반
- 확장성과 유연성을 활용한 ML 파이프라인 관리
- 다양한 ML 도구 통합
- TensorFlow, PyTorch 등 주요 프레임워크 지원
MLOps 활용 예시
- 분산 모델 트레이닝
- 모델 서빙 및 배포
- Kubernetes 클러스터에 모델 배포
- 리소스 관리 및 오토 스케일링을 통한 서빙 최적화
Vertex AI Pipeline이란?
Vertex AI Pipeline
- ML Workflow 자동화를 지원
- Data Extraction → Data Engineering → Model Training → Model Evaluation → Model Registration
등 Machine Learning Cycle 전체를 자동화 - 재사용성이 높은 Pipeline 구성 가능
- 2가지 Pipeline 방식 제공
- Kubeflow Pipeline SDK
- TensorFlow Extended (TFX)
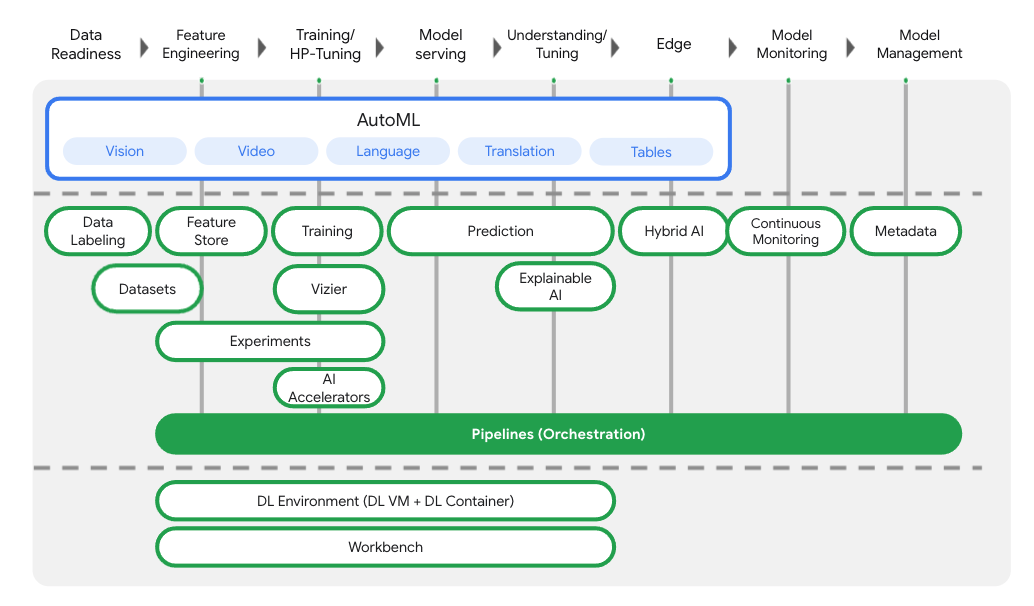
Vertex AI Pipeline 전체 구조
Vertex AI는 데이터 준비부터 학습, 예측, 모니터링까지
End-to-End ML Lifecycle을 단일 파이프라인으로 오케스트레이션한다.
Pipeline 구성
- Input
- Output
- Container Image 기반 Step
- Pipeline은 여러 개의 Step으로 구성
- 각 Step은 하나의 Container Image
- Step 간 데이터는 input / output으로 전달
Vertex AI Pipeline 설정 및 실행
Pipeline DSL (Domain Specific Language) 활용
- Vertex AI에서 제공하는 Pipeline 정의를 위한 전용 언어
- 간편한 구문으로 ML 파이프라인을 선언적으로 정의할 수 있음
@dsl.pipelinename, description- Pipeline의 각 step은 별도의 함수로 정의되며
이러한 함수들을 조합하여 하나의 파이프라인이 생성됨
Pipeline Step이란?
- 데이터 전처리, 모델 학습, 배포 등 각각의 작업 단위
- 각 step은 pipeline의 하나의 단계(stage)를 의미
- 이전 step의 출력(output)을 입력으로 받아 작업 수행
output 속성을 통해 step 간 데이터 흐름을 명확하게 정의
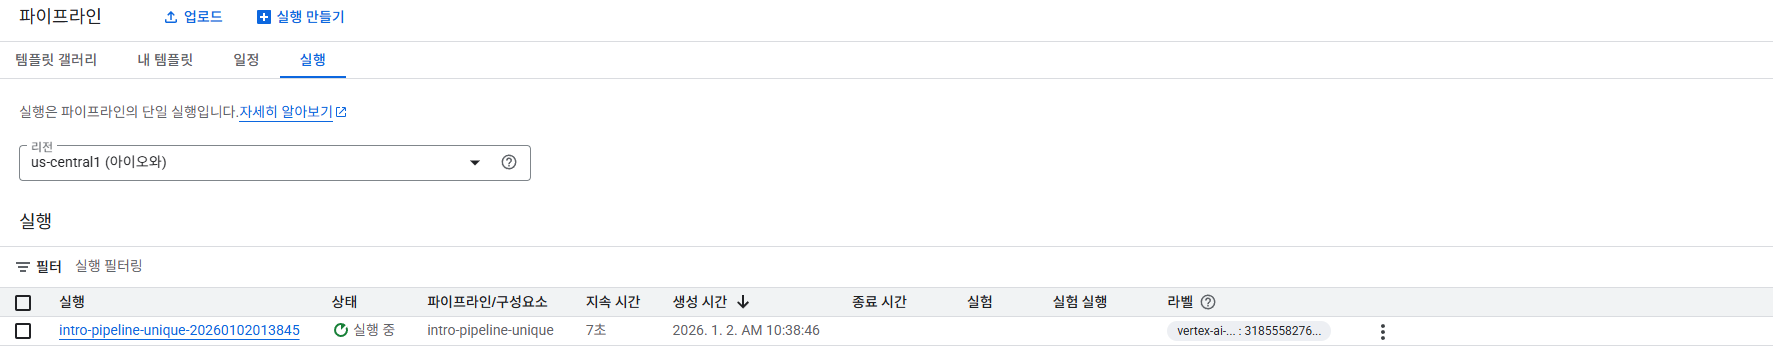
Vertex AI Pipeline 설정 및 실행
Pipeline 실행의 모니터링 지원
- Pipeline 실행은 GCP Console 또는 SDK를 통해 모두 관리 가능
- 실행 중인 Pipeline과 완료된 Pipeline의 상태를
Console 또는 SDK에서 실시간으로 확인할 수 있음 - Step 단위 실행 현황, 성공/실패 여부, 로그 추적 가능
Vertex Ai에서 Kubeflow기반 pipeline 구축
필요 라이브러리 설치
1
2
3
4
| ! pip3 install --upgrade google-cloud-aiplatform \
google-cloud-storage \
kfp \
google-cloud-pipeline-components
|
- 아래 명령어를 통해
Project_id와 Regin확인
1
2
3
4
5
6
7
8
9
10
11
| [compute]
region = us-central1
[core]
account = 374561168874-compute@developer.gserviceaccount.com
disable_usage_reporting = True
project = atomic-marking-482405-a5
universe_domain = googleapis.com
[dataproc]
region = us-central1
Your active configuration is: [default]
|
1
2
3
4
5
6
7
| from dotenv import load_dotenv
import os
load_dotenv(dotenv_path="project.env")
PROJECT_ID = os.getenv("PROJECT_ID")
REGION = os.getenv("REGION")
|
1
2
| # Project ID 세팅
! gcloud config set project {PROJECT_ID}
|
1
| Updated property [core/project].
|
CLoud Storage Bucket 생성
- dataset이나 artifact를 저장하기 위한 bucket 생성
- gsutil: Cloud Storage에 액세스하는 데 사용할 수 있는 Python 애플리케이션(mb -> makebucket)
1
| BUCKET_URI = f"gs://practice-{PROJECT_ID}"
|
1
| ! gsutil mb -l {REGION} -p {PROJECT_ID} {BUCKET_URI}
|
1
| Creating gs://practice-atomic-marking-482405-a5/...
|
Service Account 설정
- Service Account가 Bucket에 접근할 수 있도록 설정
1
2
| shell_output = !gcloud auth list 2>/dev/null
SERVICE_ACCOUNT = shell_output[2].replace("*", "").strip()
|
1
2
| ! gsutil iam ch serviceAccount:{SERVICE_ACCOUNT}:roles/storage.objectCreator $BUCKET_URI
! gsutil iam ch serviceAccount:{SERVICE_ACCOUNT}:roles/storage.objectViewer $BUCKET_URI
|
주요 Library Import (Kubeflow pipeline)
1
2
3
4
5
| from typing import NamedTuple
import google.cloud.aiplatform as aip
from kfp import compiler, dsl
from kfp.dsl import component
|
Vertex AI API Endpoint 설정
1
| API_ENDPOINT = f"{REGION}-aiplatform.googleapis.com"
|
Vertex AI Pipeline root 설정
1
| PIPELINE_ROOT = f"{BUCKET_URI}/pipeline_root/first_pipeline"
|
Initialize AI platform object
1
| aip.init(project=PROJECT_ID, staging_bucket=BUCKET_URI)
|
Python function-based Pipeline Component 설정
- hello_world 컴포넌트 정의
- @component 데코레이터를 사용함으로서 정의한 함수를 KFP(Kubeflow Pipeline)컴포넌트로 컴파일
1
2
3
4
5
6
| @component(base_image="python:3.10")
def hello_world(text:str) -> str:
print(text)
return text
compiler.Compiler().compile(hello_world, "hw.yaml")
|
- two_outputs 컴포넌트 정의
- @component에 packages_to_install을 사용하여 필요한 라이브러리 설치
1
2
3
4
5
6
7
8
9
10
11
12
13
14
15
16
| @component(packages_to_install=["google-cloud-storage"])
def two_outputs(
text: str,
) -> NamedTuple(
"Outputs",
[
("output_one", str),
("output_two", str),
],
):
from google.cloud import storage
o1 = f"output one from text: {text}"
o2 = f"output two from text: {text}"
print(f"output one: {o1}; output_two: {o2}")
return (o1, o2)
|
- three_nicemeet_output 컴포넌트 정의
1
2
3
4
5
6
7
| @component(base_image="python:3.11")
def three_nicemeet_outputs(name: str) -> str:
result_string = "Nice to meet you! " + name
print(result_string)
return result_string
compiler.Compiler().compile(three_nicemeet_outputs, "three.yaml")
|
- Consumer 컴포넌트 정의
1
2
3
4
5
| @component
def consumer(text1: str, text2: str, text3: str, text4: str) -> str:
result = f"text1-> {text1}, text2-> {text2}, text3-> {text3}, text4-> {text4}"
print(result)
return result
|
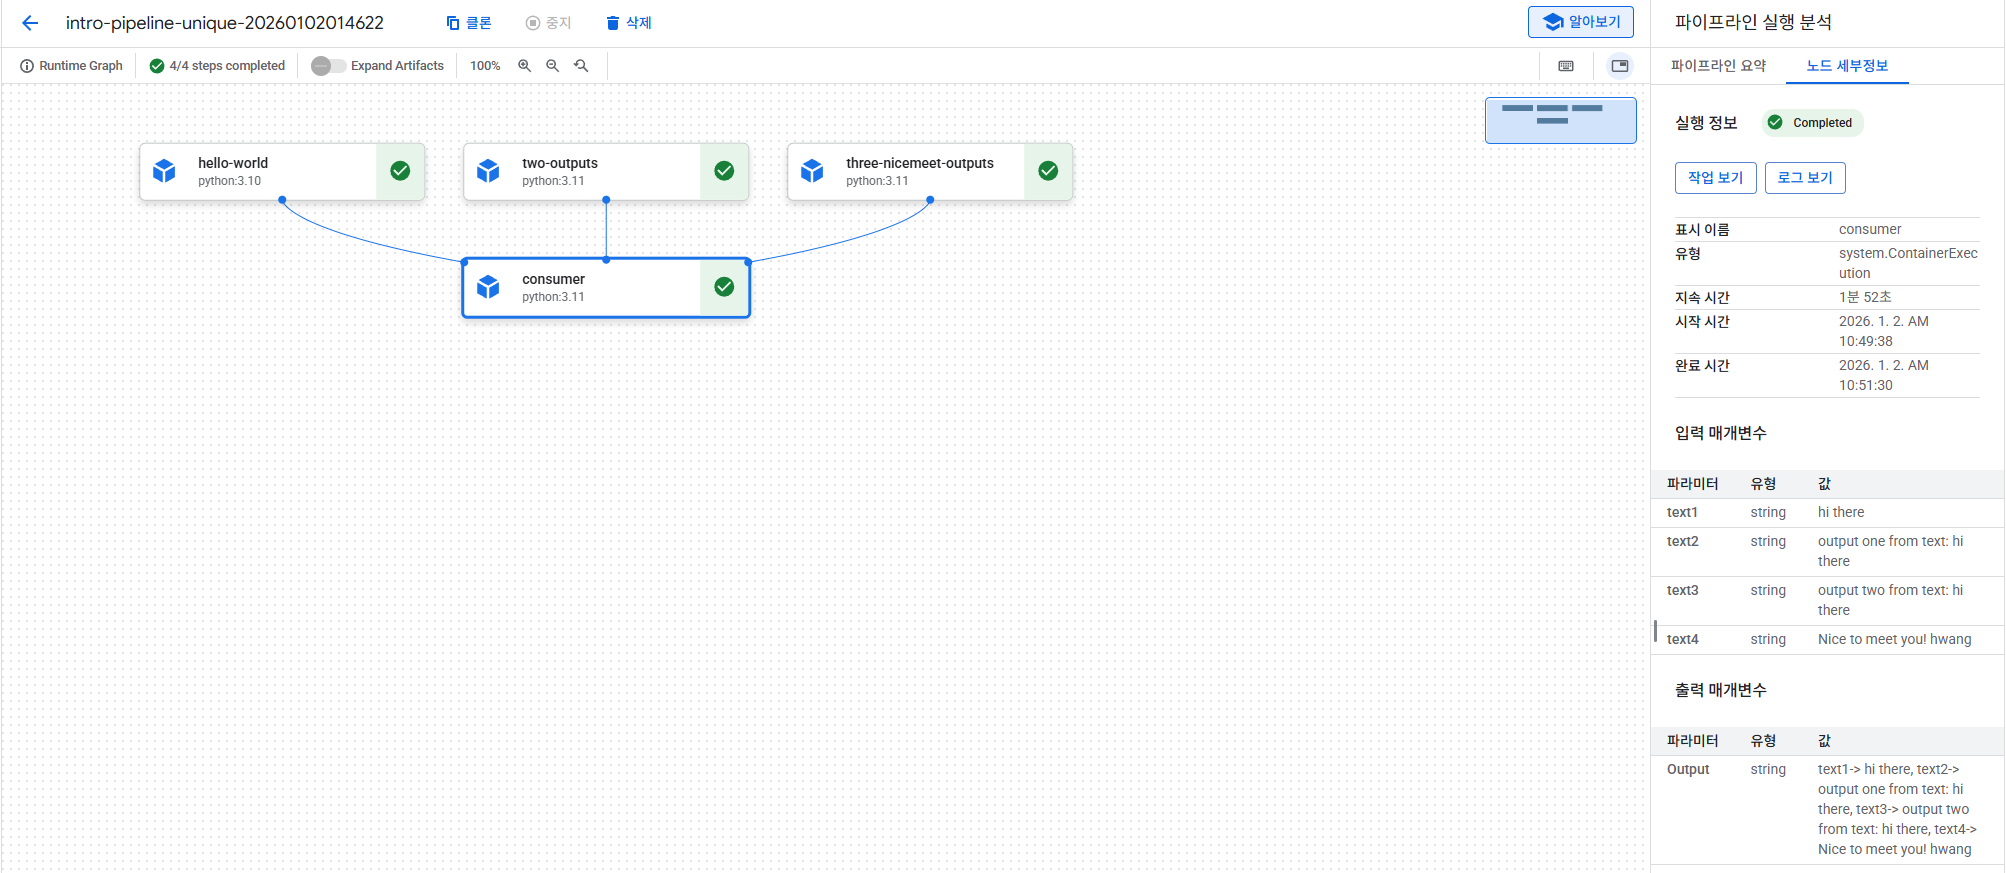
- 컴포넌트를 사용하는 파이프라인 정의
파이프라인은 입력 매개변수를 가져와서 이 매개변수를 첫 번째 세 파이프라인 단계 (hw_task 및 two_outputs_task)에 인수로 전달. 그런 다음 네 번째 파이프라인 단계 (consumer_task)에서는 첫 번째와 두 번째 단계의 출력을 사용. hello_world 컴포넌트 정의는 하나의 무명 출력만 반환하므로 hw_task.output로 참조. two_outputs 작업은 두 개의 명명된 출력을 반환하며, 이를 two_outputs_task.outputs[“"]로 액세스.
참고: @dsl.pipeline 데코레이터에서는 PIPELINE_ROOT 클라우드 스토리지 경로를 정의하고 있음. 여기에 이 정보를 포함하지 않았다면, 파이프라인 실행을 생성할 때 지정해야 했을 것임. 아래에서 볼 수 있듯이 이 정보가 필요.
1
2
3
4
5
6
7
8
9
10
11
12
13
14
15
| @dsl.pipeline(
name="intro-pipeline-unique",
description="A simple intro pipeline",
pipeline_root=PIPELINE_ROOT
)
def pipeline(text: str = "hi there", name: str = "hwang"):
hw_task = hello_world(text=text)
two_outputs_task = two_outputs(text=text)
three_outputs_task = three_nicemeet_outputs(name=name)
consumer_task = consumer(
text1=hw_task.output,
text2=two_outputs_task.outputs["output_one"],
text3=two_outputs_task.outputs["output_two"],
text4=three_outputs_task.output
)
|
Pipeline 실행
1
| compiler.Compiler().compile(pipeline_func=pipeline, package_path="intro_pipeline.yaml")
|
1
2
3
4
5
6
7
8
9
| DISPLAY_NAME = "intro_pipeline_job_unique"
job = aip.PipelineJob(
display_name=DISPLAY_NAME,
template_path="intro_pipeline.yaml",
pipeline_root=PIPELINE_ROOT
)
job.run()
|
Pipeline 제거